Log OBD data
OBD is a protocol used in most non-EV 2008+ vehicles (cars, vans, trucks).
In this section we outline how to log OBD data with your CANedge.
Note
We strongly recommend that you read our OBD2 intro before proceeding
Table of Contents
Configure your device
For a quickstart, use our ‘plug & play’ OBD2 Configuration File for the CANedge3:
FW 01.09, 500K (incl. GNSS/IMU)
Download the Configuration File to your SD card (replace the original) and safely eject the SD.
Note
This transmits common OBD2 PIDs with 500K bit-rate and 11-bit IDs (supported by most non-EV cars). See also below on how to systematically determine what your vehicle supports
Record OBD2 data
- Connect the CANedge to the OBD2 connector in your car via the OBD2-DB9 adapter[1]
- Verify that the device turns on and logs data (CH1 LED blinking)
- Disconnect the device from power and extract the SD card
- Open the recorded MF4 in asammdf and display the raw CAN trace
- If your car responds you should see CAN frames with ID
0x7E8in your data as below:
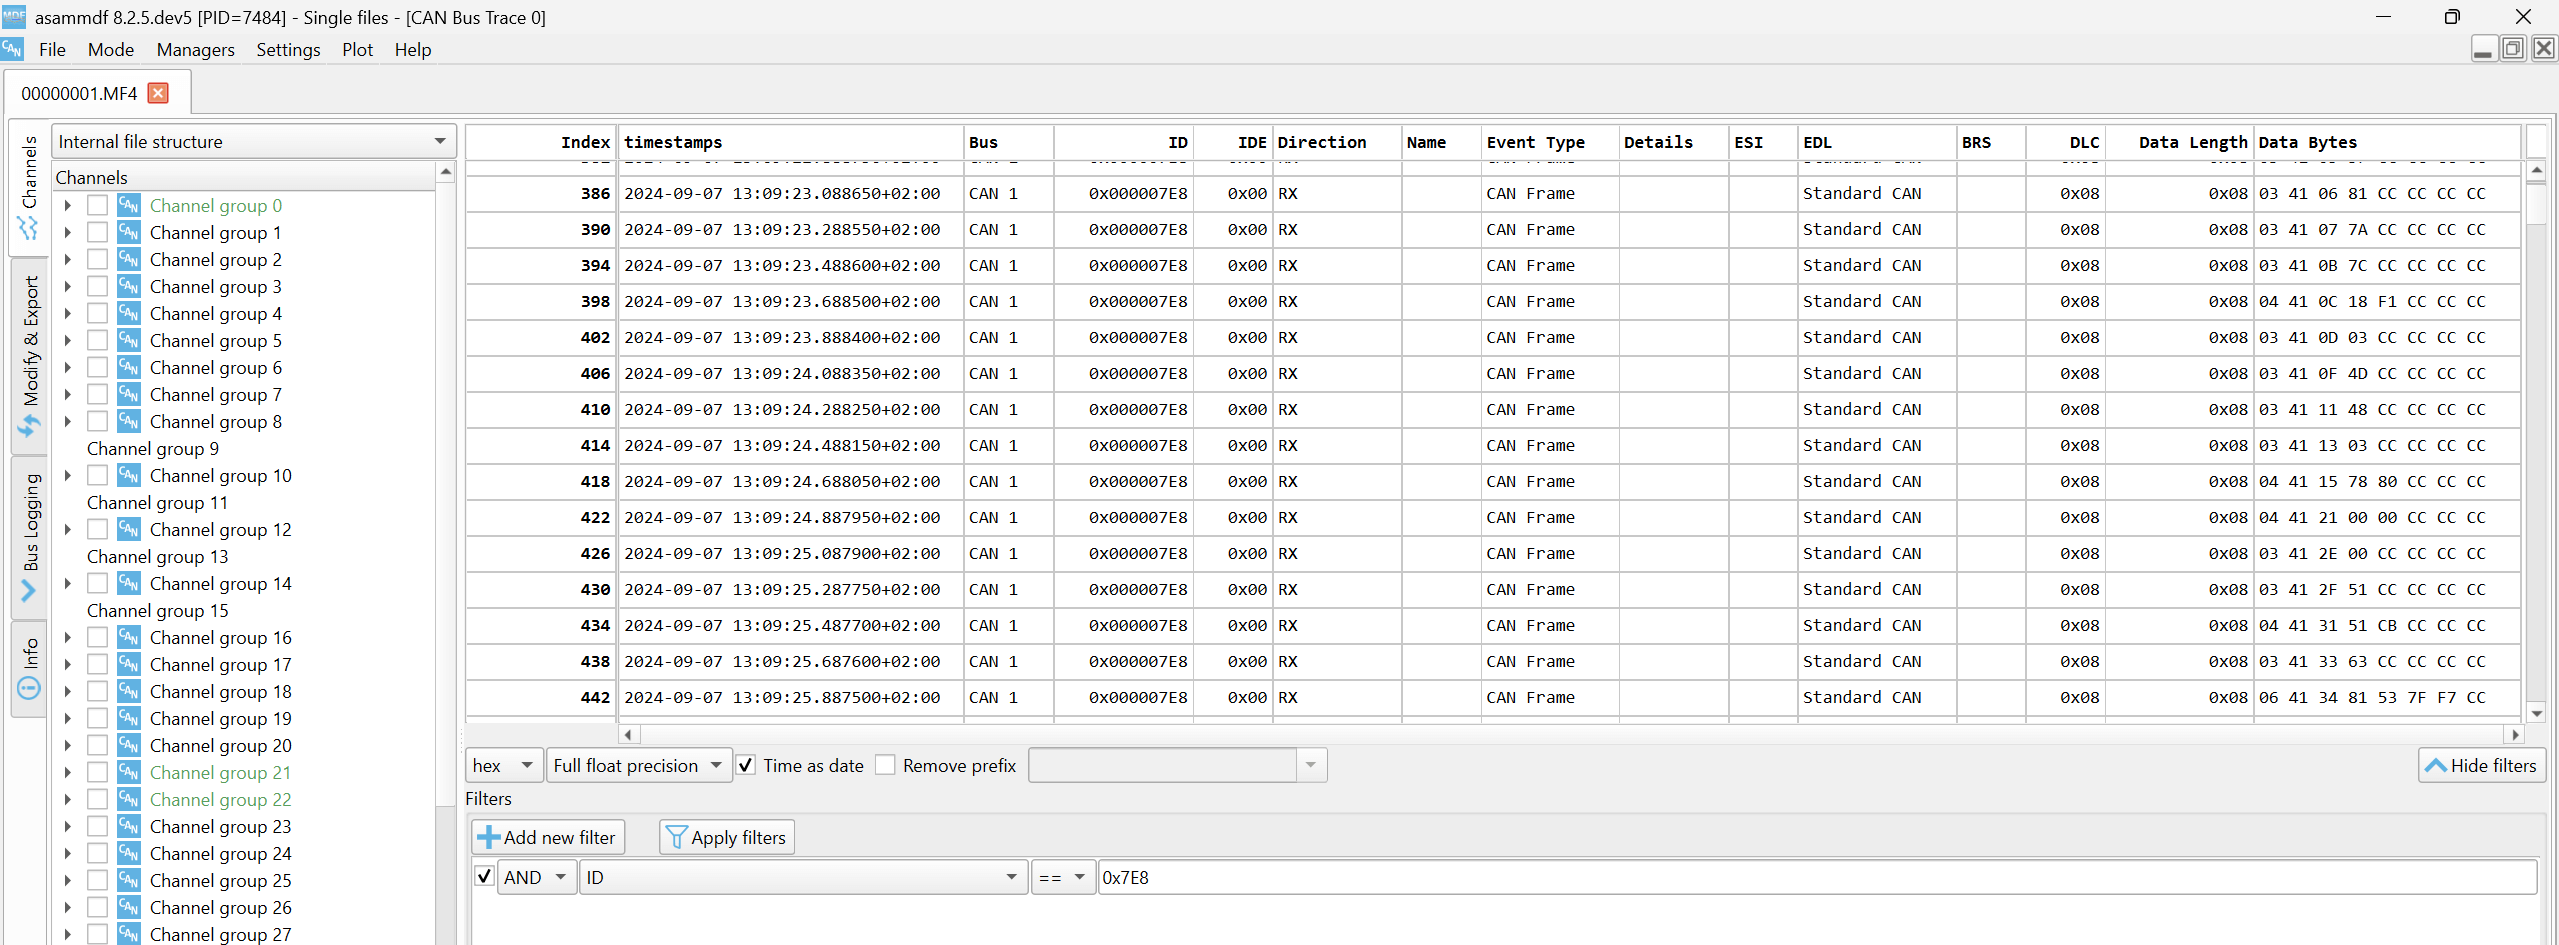
Note
If your raw data does not contain any ID 0x7E8 OBD2 responses, go to our ‘Validation’ section
DBC decode OBD2 data
To DBC decode OBD2 data we recommend to use our free OBD2 DBC.
You can decode your data via the processing tools - we recommend to start with asammdf.
Note
Use the correct OBD2 DBC for your vehicle/software (see the README in the zip)
Validation: Determine bit-rate, request IDs, protocol and PIDs
This section lets you identify what OBD data your vehicle supports and how to request it.
How to load ‘partial’ config files
First, you will need to learn how to load a ‘partial’ config file:
- Open your Configuration File in the config editor
- Click the bottom menu ‘+’ to open the ‘Partial config loader’ tool
- Navigate to the relevant partial config JSON, open it and click ‘Merge files’
1: Identify bit-rate
OBD may use 500K or 250K bit-rates - below lets you identify which one to use:
- Load below ‘partial config’ (500K bit-rate) into your Configuration File
- Download the Configuration File to your SD (replace the original) and safely eject the SD
- Start your vehicle and leave it running for ~2 min[2]
- Connect the CANedge to the OBD2 connector in your vehicle via the OBD2-DB9 adapter
- Power it for ~1 min, then disconnect the device and extract the SD card
- Open the logged MF4 in asammdf and display the raw CAN trace
- If the CAN trace includes a
CAN Frame(as in below picture), the bit-rate is 500K - If it only includes an
Error Frame, update your CH1 bit-rate to 250K and repeat the above[3]
bit-rate test 'partial config'

Example 1: The bit-rate is confirmed to be valid due to successful TX frame

Example 2: The bit-rate is confirmed to be invalid due to error frame and no TX frame
2: Identify request IDs and OBD protocol
Depending on your vehicle model/year, OBD may use one of below combinations:
- Request ID
0x7DFand OBD2/OBDonEDS protocol (most common in cars) - Request ID
0x18DB33F1and OBD2/OBDonEDS protocol - Request ID
0x7DFand WWH-OBD/OBDonUDS protocol - Request ID
0x18DB33F1and WWH-OBD/OBDonUDS protocol
By requesting data via each of the 4 methods, we can test what the vehicle responds to:
- Load below ‘partial config’ into your Configuration File
- If your bit-rate is 250K instead of 500K, update CAN CH1 accordingly
- Start your vehicle and leave it running for ~2 min[2]
- Power the CANedge in your vehicle for ~2 min
- Open the resulting MF4 in asammdf and look for
RXCAN Frameentries - If the vehicle responds to
0x7DFOBD2/OBDonEDS requests, combination 1 is supported etc[4]
IDs, protocol and PIDs test 'partial config'
Note
If your vehicle output regular proprietary CAN IDs as well, you can look for the relevant response IDs by filtering for the ranges 7E8-7EF and 18DAF100-18DAF1FF
3: Look up supported PIDs
Next, you can determine which OBD PIDs are supported based on the CAN trace:
- Open our OBD PID lookup tool and select PID 00 (PIDs Supported [01 - 20])
- Find the relevant response frame via the CAN trace (see highlighted example below)[5]
- Copy/paste the relevant 4 payload bytes into the lookup tool’s payload[6]
- Review the resulting PID list and note down supported PIDs of interest
- Optionally repeat for PIDs
0x20,0x40, … (if responses)
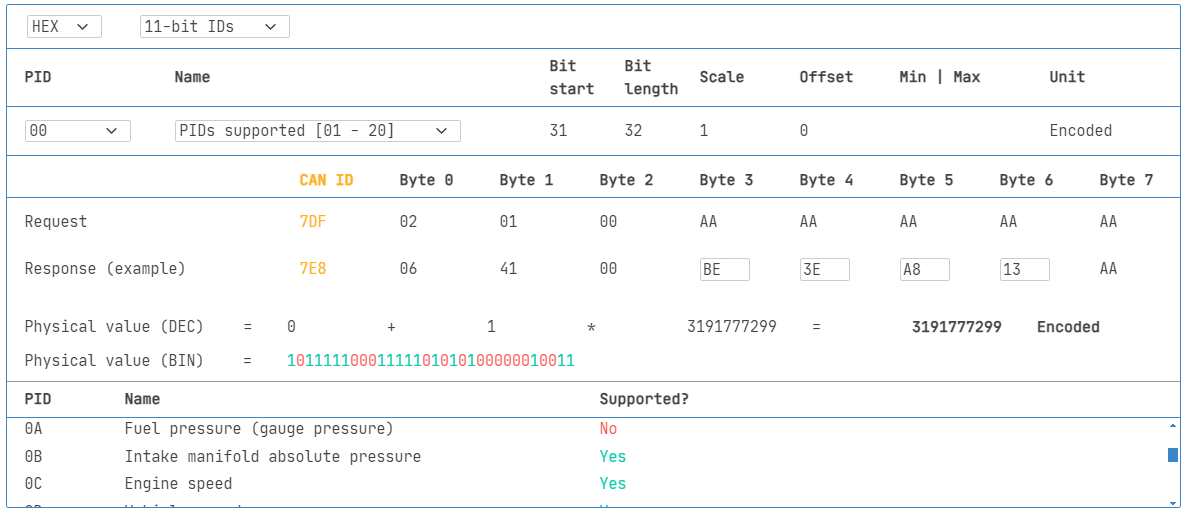
As an example, see below trace with responses to the 7DF OBD2/OBDonEDS requests:
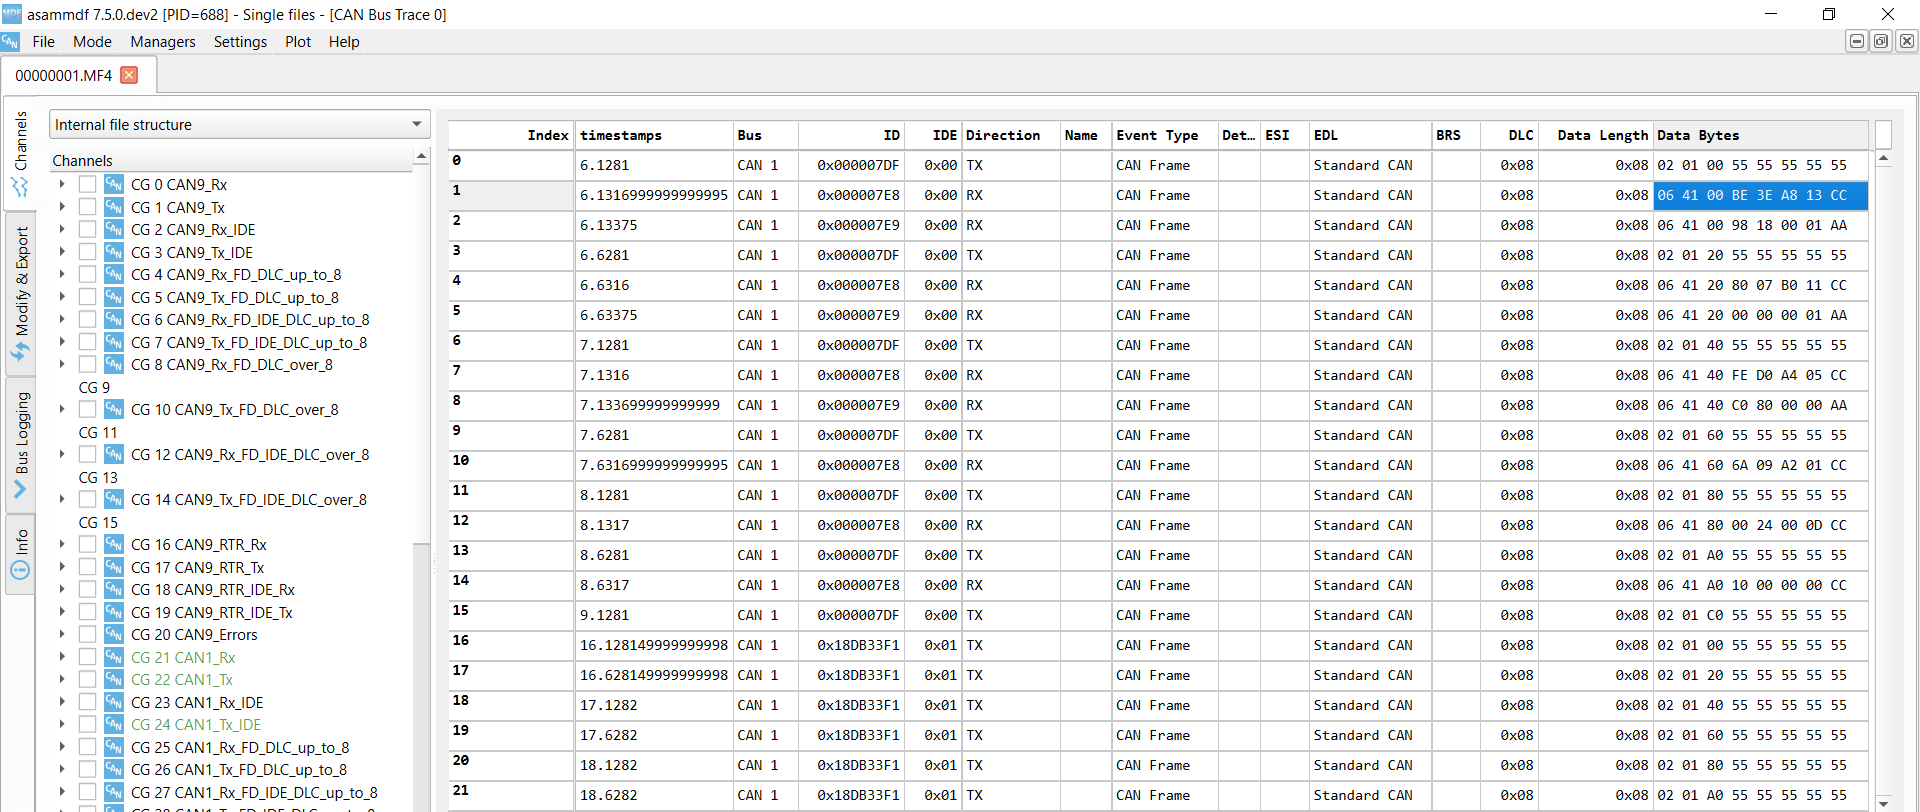
If we copy the first response (ID 0x7E8) bytes into the tool, we get below result for PID 0x00:
Note
A typical non-EV car may support 40-80 OBD PIDs out of the ~200 possible PIDs
Create a custom OBD2 transmit list
If you want to add new PID requests, we recommend to first go through the validation step to identify supported PIDs for your vehicle, then include those of interest in your transmit list.
Below we provide ‘partial’ configs for each method as a starting points for your own transmit list:
11-bit-OBD2/OBDonEDS 'partial config'11-bit-WWH-OBD/OBDonUDS 'partial config'29-bit-OBD2/OBDonEDS 'partial config'29-bit-WWH-OBD/OBDonUDS 'partial config'
Note
The above examples use 500K bit-rate for CAN CH1 - change this if your vehicle uses 250K
We recommend below steps when creating a custom OBD transmit list:
- Start out with the relevant ‘partial’ config from the above list
- In CAN CH1 remove requests that are not supported by your vehicle
- For each PID you wish to add, add a new entry to the transmit list
- In the entry, copy all fields from the entry above
- In the data payload field, set the 3rd byte to match the hex PID value
- Update the entry name to something suitable, then repeat for the next PID
- When your list is complete, review all
periodandoffsetvalues - Ensure the
offsetvalues ‘space out’ all messages by 300-500 ms[7] - Ensure
offset < periodfor all entries, otherwise the Configuration File will be invalid
OBD requests & battery drainage
The CANedge consumes <1W[8], which is not an issue for your car battery in practical use cases.
In most cases, the device also turns off with your vehicle ignition. However, if this is not the case then OBD2 requests may ‘wake up’ the car ECUs. In such scenarios consider below solutions:
- Disconnect the device between trips
- Re-wire your OBD2 connector so that the power pin is linked to the ignition
- Use a DB9-DB9/DC splitter and a cigarette-to-DC adapter to power the device
- Turn transmission on/off via a control signal - e.g. internal GPS speed as per our guide
Advanced: Multi-frame OBD2 data (ISO TP)
Some OBD2 communication involves multi-frame data, e.g. DTCs, VIN and more. To request such data, you need to use flow control frames - see our OBD2 intro for detailed examples. Below is an example request for the Vehicle Identification Number. You can DBC decode and visualize multi-frame data using the MF4 decoders and e.g. Grafana dashboards.

| [1] | We strongly recommend using one of our OBD-DB9 adapters as 3rd party cables often use different pinouts. |
| [2] | (1, 2) The vehicle ECUs may take some time to boot up and acknowledge CAN frames, hence it is useful to wait for a few minutes with the vehicle turned on |
| [3] | Even if the bit-rate is valid, disconnecting the device from an active CAN bus may result in error frames. As such, you should focus on whether the log file contains a CAN Frame or not |
| [4] | A vehicle may produce responses to multiple combinations (e.g. 7DF with both OBDonEDS and OBDonUDS). In such cases, we recommend to look at which PIDs are supported by each method |
| [5] | For OBD2/OBDonEDS this will start with payload 06 41 00. For WWH-OBD/OBDonUDS it will start with payload 07 62 F4 00 |
| [6] | For OBD2/OBDonEDS, copy/paste the 4th to 7th bytes. For WWH-OBD/OBDonUDS, copy/paste the 5th to 8th bytes. Regardless of the protocol used, the bytes should be pasted into the 4 available fields in the OBD2 lookup tool |
| [7] | In the plug & play config, this is ensured by having a sequence of transmit messages be sent out over a 5000 ms period. If you need to add more transmit messages than what fits in that list, you should expand the period accordingly |
| [8] | The CANedge3 consumes up to 2.5W during active LTE transfer |