Wireshark
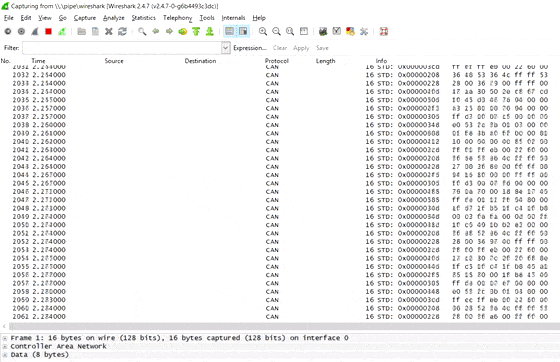
In this section we go through useful functionality in Wireshark for streaming CAN data.
Note
We recently added support for SavvyCAN, which we consider superior vs. Wireshark for CAN streaming - for most use cases we therefore recommend SavvyCAN over Wireshark.
Table of Contents
Installation
Below we outline how to install Wireshark:
Stream data via the CLX000
- Follow the streaming guide to setup the CLX000 for streaming
- Open CANvas, go to ‘Live stream data’, click Connect and then Start
- You shold now see a stream of raw CAN data (as in the video above)
Note
CANvas will prompt you to auto-install our Wireshark plugin for extra features (recommended)
Note
In some cases you may need to manually install USB drivers
Basic features
Customize columns
You can easily adapt the column structure. To remove a column, right-click and select “Remove Columns”. To add a data field as a column, right click it in the frame details pane and choose “Apply as Column”. This is particularly useful for adding columns with OBD2/DBC physical values, min, max, names etc. You can rename the columns “Column Preferences”.
Colorize data
In the frame details pane, right-click a field to e.g. color all occurrences red where a specific CAN message contains a specific range of data bytes.
Add filters
Filters help retain an overview of your data. To add filters, right-click a data field in the details pane and select ‘Apply as Filter’. This will update the upper left text field and you can now edit the details to fit your needs. For example you can write can.id == 0x000007e8 to only see OBD2 responses. Using the Expression button also lets you build more advanced filters.
Export data in custom formats
Wireshark lets you easily save your stream session data in various custom formats (incl. CSV, TXT, JSON, PCAP, C, PS and more). Further, you can apply filters to your data and only save the visible selection.
Plugin features
Decode OBD2 data
If you’re streaming valid OBD2 data with CAN ID 7E8, you can use the Wireshark plugin to decode it in real-time. To do so, select a frame, right-click and select “Decode As/OBD-II (CSS Electronics)”. This lets you stream human-readable OBD2 data in real-time.
We recommend that you go through our OBD2 logging guide before trying to stream OBD2 data.
Decode CAN data via DBC (incl. J1939)
You can load a DBC file in Wireshark to decode your raw CAN data (incl. J1939) in real-time. To do so, go to “Edit/Preferences/Protocols/CAN DBC” and click Edit, then New and browse to your DBC file. You can specify ‘DBC type’ to switch between regular and J1939, then click OK. Next, right-click a CAN frame and click ‘Decode As’ and choose ‘CAN DBC’. By default, data is streamed in ‘message view’ (1 frame per CAN ID), but you can switch to ‘signal view’ (1 frame per signal). To enable signal view, check “Signal per row” in the preferences, re-start Wireshark and re-enable your decoding. It can be helpful in this case to add additional columns.
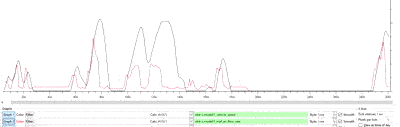
Plot decoded CAN data
To start up a plot, go to Statistics/IO Graph. Here, you can start by setting the X-axis to show “Time of day” and the Y-axis unit to “Advanced…”. Next, set the Calc field to “AVG(*)” and to the right enter “can-dbc.” in the field. This brings up a drop-down to scroll through Messages and Signals of the DBC file. Select one and click the Graph button to plot it. Remember to set a reasonable interval frequency to avoid funky plots (e.g. 10s or 1 min).
Load a CLX000 log file
You can load CLX000 TXT log files directly in Wireshark simply via “File/Open…”.
Use CAN Live ID
The CAN Live ID view is useful for showing a trace of each CAN ID with highlights of changing data bytes. This can be used in e.g. reverse engineering. To open this view, go to “Statistics/CAN Live IDs”. For each CAN ID, a number of fields are shown, which are explained below.
- Count: Number of times the CAN ID has been observed in the data
- Frame No: Frame number of the latest observation of the ID
- Time (s): Time of the latest observation of the ID (since start of streaming)
- Period Time (s): Time between the latest ID and the previous ID observation
- CAN ID: HEX value of the CAN ID
- D0-D7: The 8 data bytes of the CAN message (in HEX)
- Frame No. (Last Change): Frame of last different valued occurrence of the ID
- Time (Last Change) (s): Time since start-of-streaming and the latest change in the ID
You can change the settings in “Edit/Preferences/Statistics/CAN Live”:
- Data bytes to include in ID: For most applications this should be set to 0 - but if you e.g. want to look at OBD2, you need to add the first 3 data bytes to get the unique ID
- Change highlighter decay rate (frames): This specifies the speed at which the color highlight dissapears - the higher #frames, the slower the decay
- Automatically hide IDs with no change: Enabling this means that IDs will be hidden from view if they do not have changing data bytes for a duration specified in the settings
