Reduce your log file size
In this section we explain how you can reduce the size of your CANedge log files.
Table of Contents
Identify the data you need
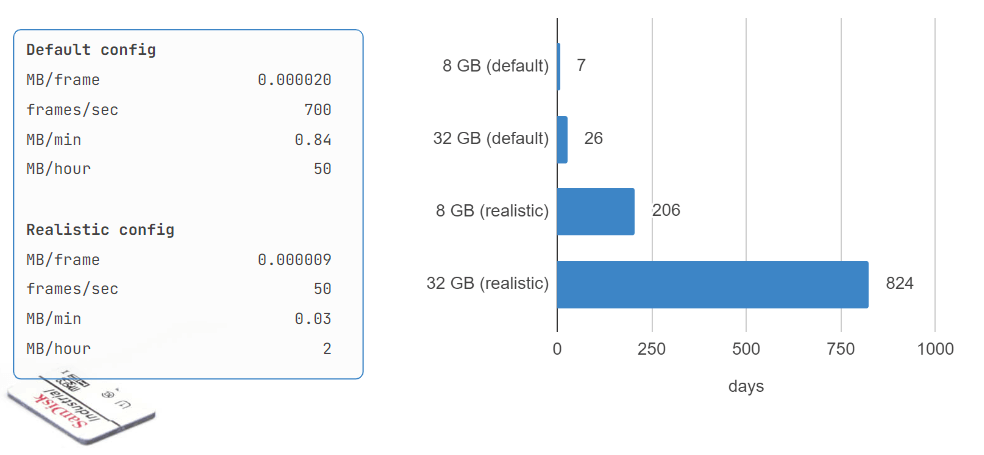
By default, the CANedge records all raw CAN/LIN frames at their original frequencies on the networks you connect it to. However, as illustrated below, the file size can often be reduced drastically (often by 90%+) through device configuration.
Before starting, you should go through the full process of recording and analysing your data without trying to reduce it. This provides a ‘baseline’ of log files you can use for the below analysis.
Identify non-decodable CAN IDs
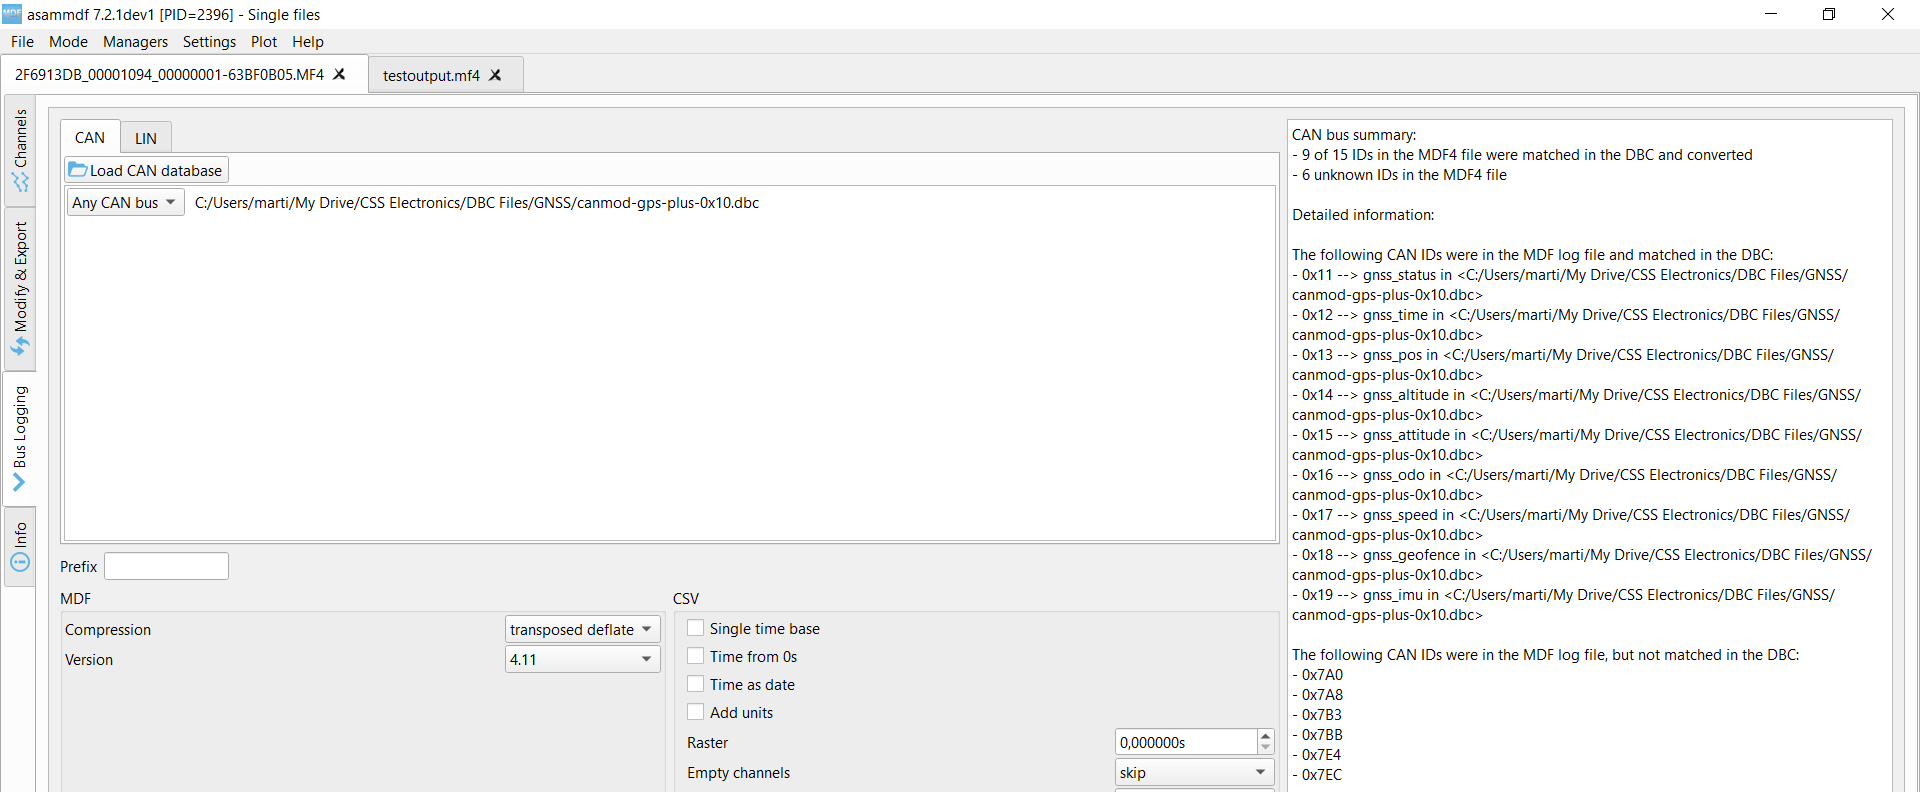
In many cases your log files contain CAN IDs that you cannot decode with your DBC file. To quickly identify these, see the asammdf decoding summary. A quick way of reducing your file size is simply to remove non-decodable CAN IDs.
Identify relevant CAN messages
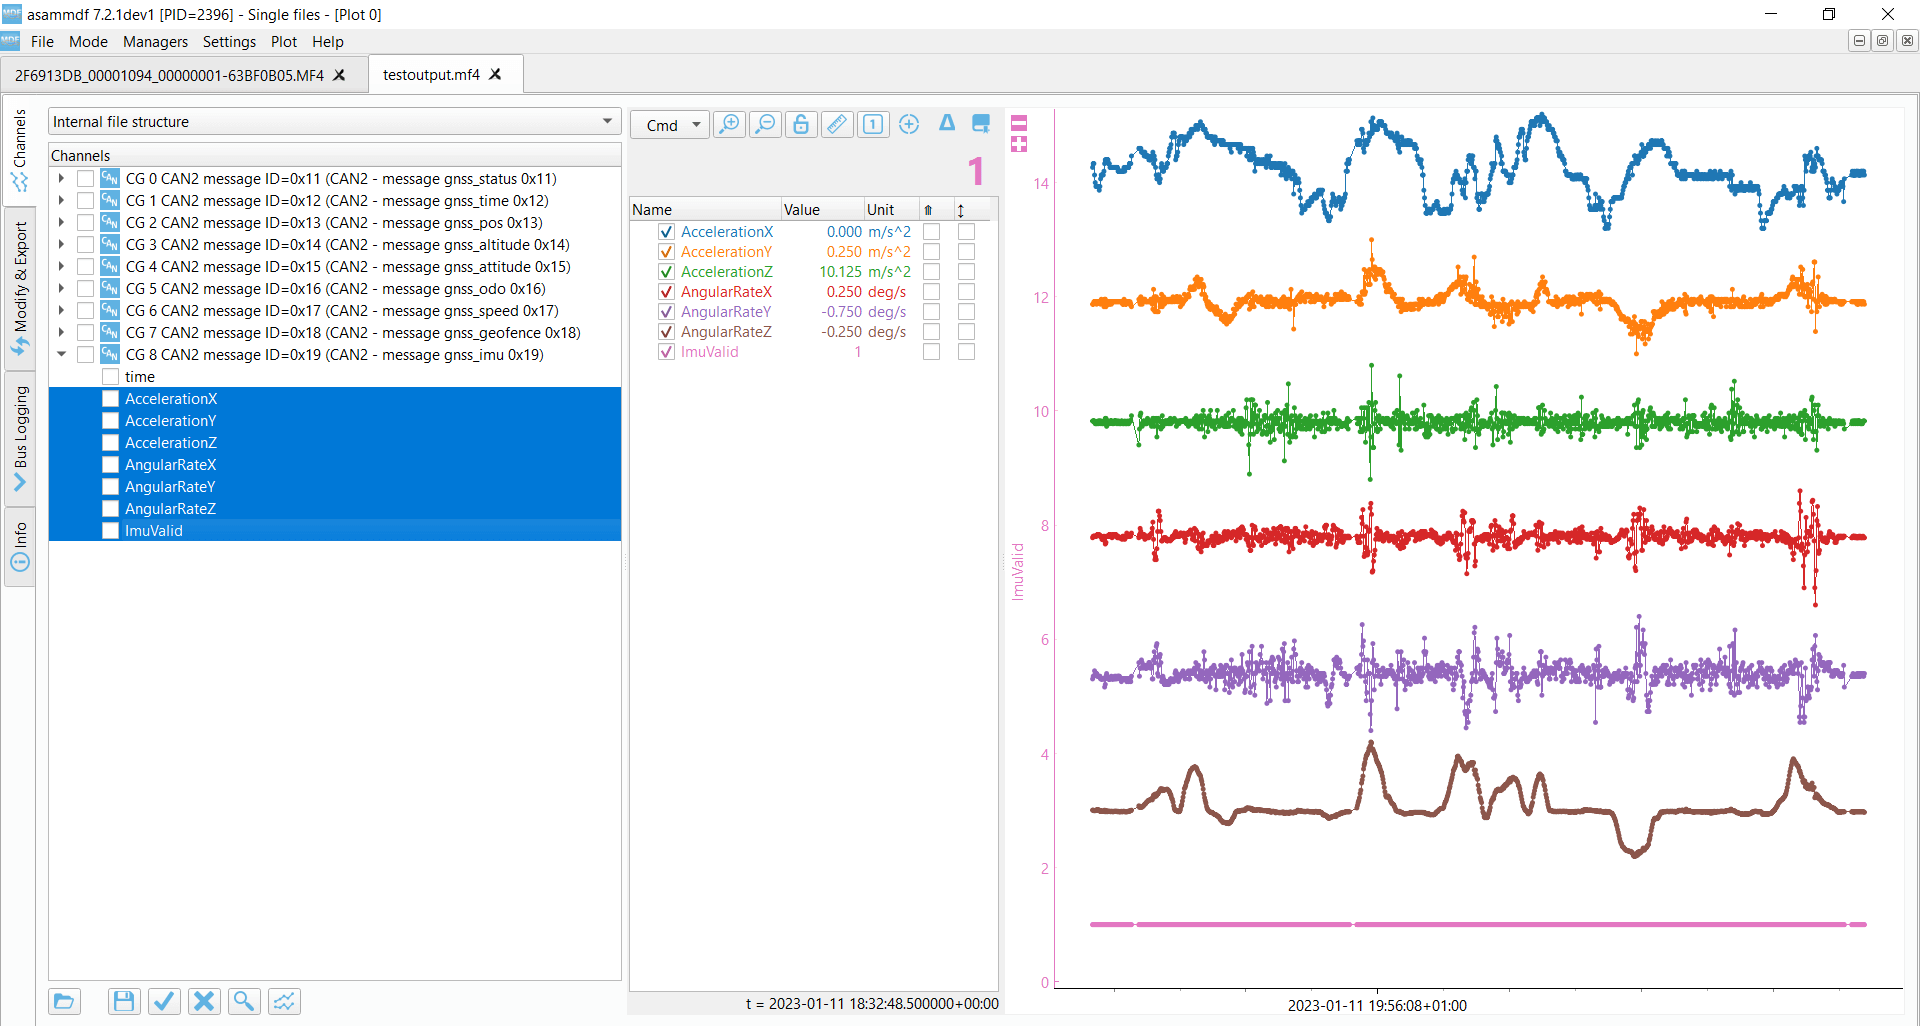
In most cases, we recommend to identify specifically which CAN IDs you need. Once you’ve DBC decoded your data, you can start to review which signals (and hence CAN IDs) you actually need. In the asammdf GUI you can double click signals for details (like their DBC descriptions). Further, you can plot entire messages as stack plots for quick analysis. Subsequently, you can note down the CAN IDs containing relevant signals.
Identify relevant message frequencies
For each message, consider whether you need the ‘original frequency’ or if less will suffice. In the asammdf GUI, you can click . to display dots that indicate actual observations. This is useful in evaluating which messages can be recorded at a lower frequency without loosing insights.
Set CAN ID filters and prescalers
Once you’ve analysed your data, you can set up filters and prescalers.
For a detailed walkthrough of this topic, see the CANedge Docs.
Below we provide a step-by-step guide to add a filter for each CAN ID you wish to record:
- In the config editor enable the ‘Advanced’ view and find the Filter section (CAN CH1/CH2)
- Delete the two default ‘acceptance filters’ from the filter list (these log all CAN IDs)
- Add a new
Rangetype entry for each CAN ID you wish to record - Set the ID format to match your CAN ID,
Standard (11-bit)orExtended (29-bit) - Set the range start/end to both equal the CAN ID
- Optionally add a prescaler to reduce the frequency of the recorded IDs
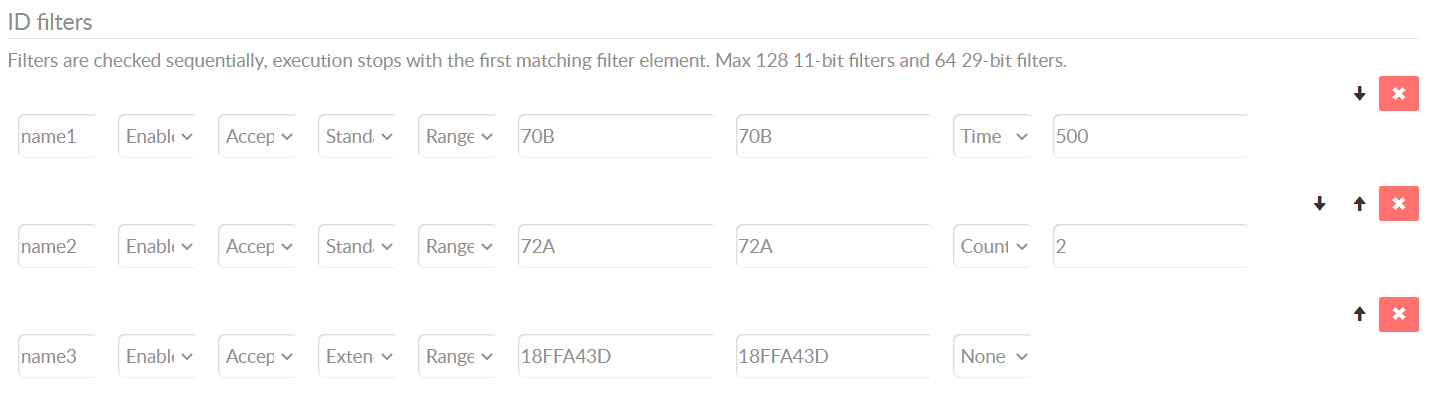
Example: Record 3 CAN IDs
Below example would result in the following:
- Only the CAN IDs
70B,72Aand18FFA43Dare recorded 70Bis recorded once every 1000 ms72Ais recorded once every 2nd time it occurs18FFA43Dis recorded at the original broadcast frequency
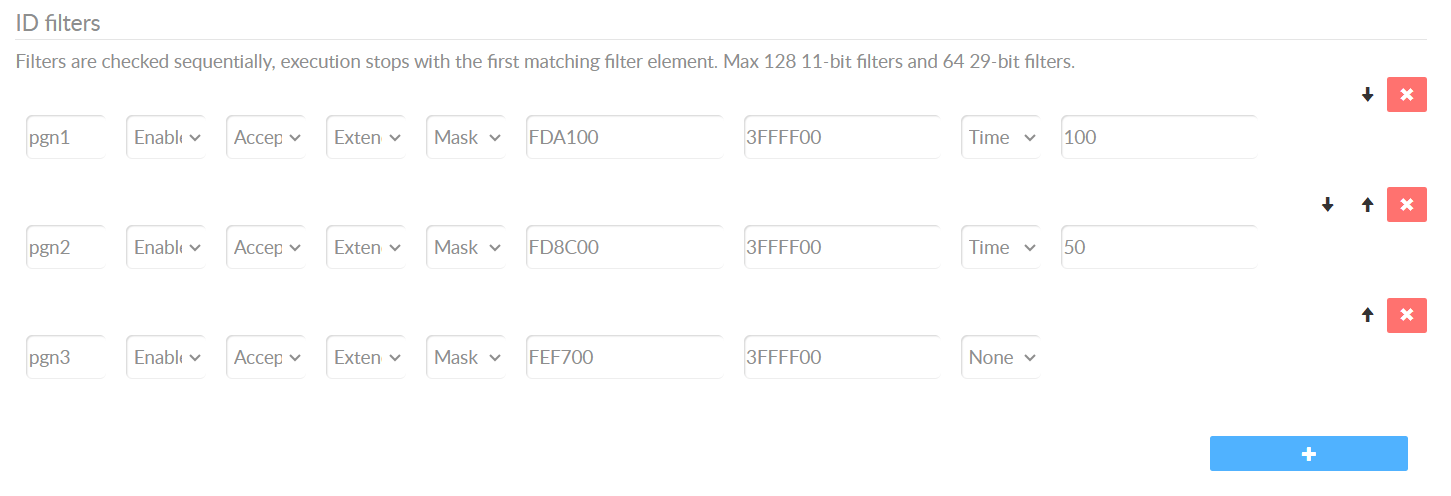
Example: Record 3 J1939 PGNs
You can also setup filters to match 29-bit CAN IDs based on their 18-bit J1939 PGNs:
- Set the filter type to
Maskand the ID format toExtended (29-bit) - In the ID field enter the PGN followed by
00(e.g.F00400for PGNF004) - In the Mask field, enter
3FFFF00
The below example records only the PGNs FDA1, FD8C and FEF7:
You can use the asammdf decoding summary to identify which PGNs can be decoded.
Enable data compression
You can use compression (in the LOG section) to reduce file size by 50-70%.
Note that your files will be converted from MF4 to MFC in this case. The CANedge Python API and MF4 converters natively process MFC files, so for these tools there will be no ‘downside’ to this. If you use asammdf, you must first convert MFC files to MF4 via the MF4 converter mdf2finalized.
Setup control signals
Finally, if you only need to record data under certain circumstances, you can use the Control Signal to start/stop logging based on CAN signal thresholds. For detailed examples of how this can be used, see the CANedge Docs.
You can use the control signal to e.g. start logging based on a signal exceeding a limit, or a DTC being flipped. You can also control the behavior of CAN 1 based on a signal on CAN 2.
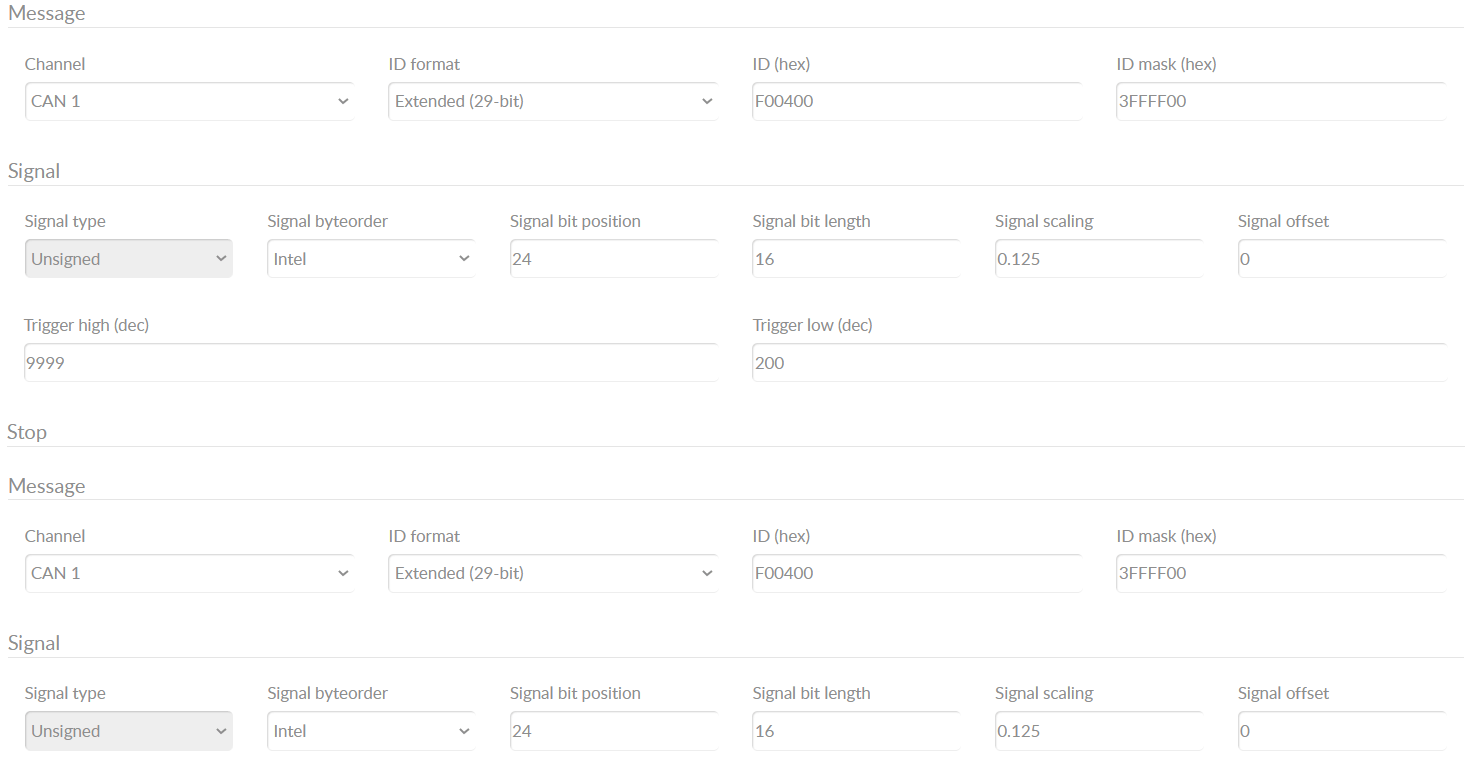
Below we show how to start/stop logging based on Engine Speed (J1939):
- In the editor, show the ‘Advanced’ view and select CAN 1
- Set the ‘Reception (rx) initial state’ to
Disable - In the Control section, set the ‘Control reception (rx) state’ to
Enable - In the Start/Stop sections, enter the signal decoding details[1]
- Set the Start trigger low to 200 and the high to an arbitrarily high number
- Set the Stop trigger low to 0 and the high to 199
Below ‘partial config’ contains this example[2]:
FW 01.07, J1939 engine speed control signal 'partial config'
| [1] | You can find the decoding details via your DBC file. Optionally, you can use our DBC editor to load your DBC file to identify the various fields |
| [2] | You can load this into your own Configuration File with the ‘Partial config loader’ editor tool |